
The Violin Bow Hold
The Violin Bow Hold is one of the most important techniques to learn when starting to play the violin. Learning the violin bow hold should be taught in one of the first violin lessons. And the violin bow hold is always improved and perfected over the entire musical career of any violinist no matter how advanced. The right hand always holds the bow. It doesn’t matter if the person is left handed or right handed, since bot hands are equally dominant when playing the violin, everyone always holds the bow with the right hand and the violin with the left.
This is informational only and just a guide to be used as a supplement to violin lesson. Please make sure to consult your teacher about your violin bow hold.
So let’s learn all about the violin bow hold. There are many terms used that are parts of the bow and important to know. Before reading further about the Violin Bow Hold familiarize yourself with the parts of the bow here.
1 – Relax the hand.
Shake out the right hand so that it relaxes completely and there is no tension in the muscles. Turn the palm upwards and let the fingers naturally curl and the thumb will have a slight bend. This is the natural position of the hand and the beginning of the violin bow hold.
2 – Flop the fingers over the frog.
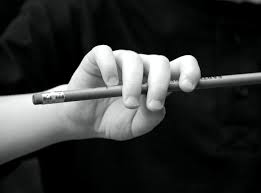
Let all four fingers fall over the top of the bow at first. The middle two fingers (huggers) should be making contact with the stick between the first and second knuckle. They will wrap around gently top “hug” the bow, that’s why we sometime call them the “huggers”. The middle finger can rest on the ferrule and the ring finger should be right next to the middle finger without too much space in between. (see pic)
3 – Bend the thumb.
To have a good violin bow hold the thumb must be slightly bent and should make contact with the bow on the inside corner of the thumb. (see pic) When just starting to hold the bow it is common to place the thumb on the outside of the bow on the corner of the ferrule. This position is great for a child to learn the violin bow hold. After becoming comfortable playing with the thumb on the outside you can move the thumb to the inside of the bow between the stick and hairs. Most bows have a small space between the bump on the frog and the grip or wrapping. This is where the inside corner of the thumb should touch, leaning slightly on the bump of the frog. It is ok if the knuckle of the thumb touches the hairs slightly since the thumb should be bent. (see pic)
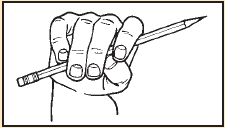
4 – Curve the pinky.
The pinky has a very important job on the violin bow hold. The pinky controls the tip of the bow. It needs to sit on top of the stick and be curved and relaxed. Some teachers use corn pads as “pinky houses” tho help keep the pinky form slipping off the stick. If the bow has an octogan shape then the pinky should be renting on the flat side that is closest to the hand
5 – Rest pointer the finger on the stick
The pointer finger should rest of the bow touching the stick between the 1st and second knuckles. The pointer finger guides the bow while playing. Be careful not to wrap th4e pointer finger around the stick and keep from pushing too hard with this finger. Remember that the two middle fingers or “huggers” hold the bow not the pointer finger. In fact, a great exercise to strengthen the violin bow hold is to lift and tap first the pinky and then the pointer finger alternating between each.
Ready to pursue
your dream?
Schedule just 1 lesson, a few lessons or recurring lessons.
Join Online Violin Group Class.